How to Put Together a Western Headstall
Updated January 18, 2023
Learn how to put together a Western headstall with this step-by-step guide and how-to video! While we will be assembling SmartPak headstalls, these directions can be followed when setting up most brands of Western horse bridles.
Different Types of Western Headstalls
There are lots of different options when it comes to choosing a Western headstall. One of the primary differences is the browband. Some headstalls have a full browband that goes across the horse’s forehead and two ears. Others are designed to go around just one of the ears (called a single ear headstall) or loop around both ears individually.
Another common difference among Western bridles is the types of closures on the headstall and reins – some have tie ends, buckles, or snap pieces. The difference between these closures is mainly personal preference and how quickly you may want to be able to put the bridle on or change bits. Keep in mind that you can mix and match headstalls, bits, and reins to suit your horse's individual needs and your personal preferences.
Video on How to Put Together a Western Headstall
Sit back and watch as SmartPaker Sarah assembles two types of Western headstalls, showing you how to properly put together parts of the bridle such as the reins, bit, curb chain, and different types of closures.
Step-by-Step How to Assemble a Western Headstall
1. Make sure the bit is facing the right way.
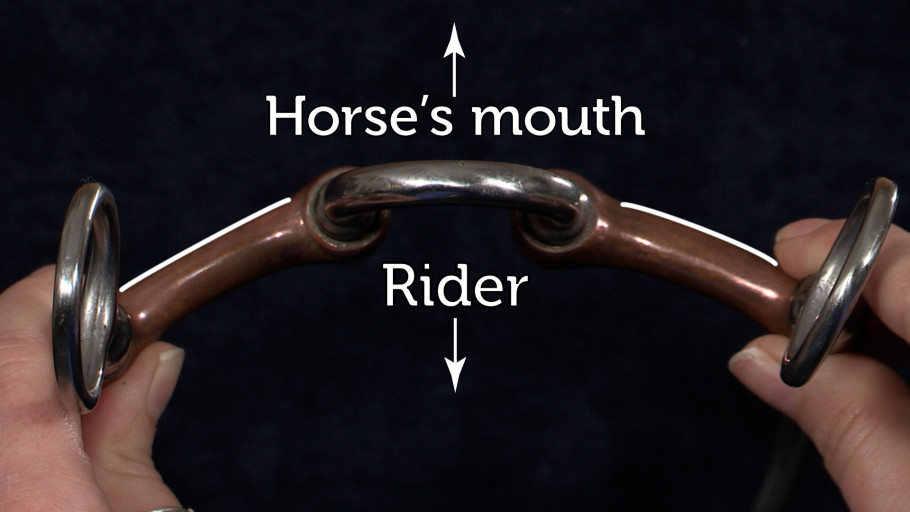
One of the most common misconceptions is that bits can go either way in the horse’s mouth, but there actually is a frontwards and backwards. So, you can put your horse's bit in the wrong way by mistake. Fortunately, it's easy to tell which way the bit should face by holding onto the rings of the bit with each of your hands and looking down. From the top, you should be able to see a gentle curve in the mouthpiece. You want that curve to bend outwards, so it's pointing out of your horse's mouth and can softly bend in a V-shape while riding.

2. Attach the bit to the headstall’s cheek pieces.
Once you know which way your bit is facing, start with one end of your headstall and pass the leather through the bit ring. Then simply tie your ends closed. There are different ways you can tie the ends, and often it's a matter of personal preference. You can use a simple knot or double knot for more security.
Move on to tying the bit onto the other side of the headstall by passing the leather through and finishing with the same knotting technique. It's important when you're feeding the leather through the top portion of the bit that you make sure you don't have any twists in your headstall. Check by laying your headstall out flat to ensure there are no twists or turns in the leather.

In addition to making sure that your headstall doesn't get flipped or twisted, you want to check that the shanks of your bit aren't flipping over as you're tying them. Your shanks should always bend towards the back.
3. Attach the reins to the bit.
Your reins may have the same tie ends as our headstall which is helpful because you can use those knots as your example going forward. You want to do the exact same thing when you attach your reins. Feed the leather through the bit rings, and then tie it off.
As you're tying the reins on, you might notice that sometimes the holes are a bit small (especially on new reins), which may take a bit more effort to get the ties through. A tip to make it easier would be to hold just below the leather and twist the tie while feeding it through the hole.

4. Put on the curb chain.
If you’re using a shank bit, then you’ll finish putting the bridle together by adding the curb chain. Make sure that the enclosure on the curb chain faces out. Feed the leather through, buckle the curb chain closed and feed it through the keeper. As you attach your curb chain to the other side of the bit, check that all of the links of the chain are lying flat and that you don't have anything that's twisting or getting caught up.
5. Adjust the headstall and bit to properly fit your horse.
When you go to try the new bridle on your horse, keep in mind they are fully adjustable to fit his individual shape. When putting on the bridle, start with it a little looser than it looks like it should be, so it won’t be too tight when you first fit it. Adjust the ear pieces or browband up or down, making sure it’s not pinching your horse. The headstall and bit should be comfortable for your horse so you both can have a great ride.
And just like that, your bridle is assembled!
Article originally published August 20, 2015.